The workers from Pumper Plumbing have been busy on all the HVAC duct-work lately. The sheet aluminum is bent and cut as needed using the very large machine shown here:
The "bare" lighting in the basement is now operation which no doubt makes it easier to work in there. The temporary heater hanging from the trusses near the wall will stay until the basement drywall is completed. Drywall is needed down here by code as a fire barrier to the Styrofoam on the inside of the ICF. Drywall work creates a lot of fine dust and you do NOT want that getting sucked through a brand new furnace (filters aren't perfect).
Monday, February 28, 2011
Siding nearly completed
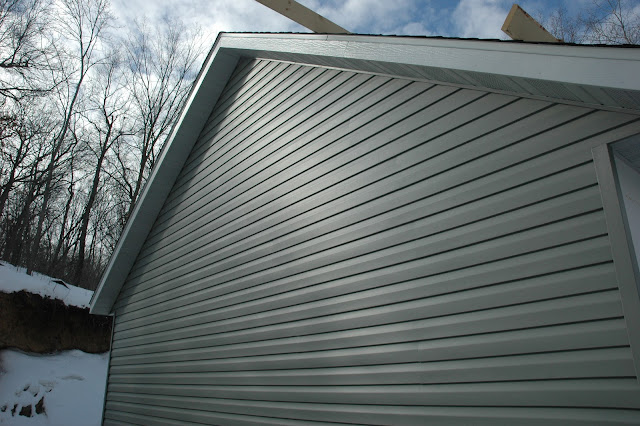
Pretty much all the siding is on the house at this point.
All that remains is the base portion of the front part of the house seen below.
The siding is Vision Pro Vinyl Siding in Double 5" Dutch Lap. It is a product of Georgia-Pacific.
All that remains is the base portion of the front part of the house seen below.
The siding is Vision Pro Vinyl Siding in Double 5" Dutch Lap. It is a product of Georgia-Pacific.
Interior painting and ceiling texture
The ceiling "knock-down" texture and flat white primer paint has been completed in all the upstairs rooms. This gives the house a very bright feel.
Many of those holes in the ceiling should have proper light fixtures installed very soon.
Many of those holes in the ceiling should have proper light fixtures installed very soon.
Thursday, February 17, 2011
Plumbing status
The water lines and valves for both bathroom showers have been run. These days, plumbers use Wirsbo brand Pex plumbing lines, which have a number of benefits over Copper or PVC pipes.
Above are shots of the master shower. There will be a shower head on each end, and a rain shower head above from the ceiling. Thank God for cheap hot water! The guest bathroom, below, has a standard shower/tub with a single head.

Above are shots of the master shower. There will be a shower head on each end, and a rain shower head above from the ceiling. Thank God for cheap hot water! The guest bathroom, below, has a standard shower/tub with a single head.
Here is a quick shot of the basement utility area. You can see some of the Pex lines dangling, as well as a lot of wiring. All my Cat-6 runs come to this area, they are on the right.

Drywall Progress
Wow, lots has been going on this week, the drywall upstairs is all set and mostly sanded and taped as well. Here are a few photos:
Monday, February 14, 2011
Warmer weather finally!
During the cold spell, some of the siding went on the house. It is a dark grey/green color called Thistle:
However, the weather warmed up late last week, and VanHaren Construction was able to get the basement concrete slab poured:
With this completed, I have access to the main floor trusses, so I can finish my runs of Cat-6a. I hope to complete that tomorrow. In the meantime, drywall has also started going up:
More pictures of that coming tomorrow.
Wednesday, February 9, 2011
Upstairs progress
Over the weekend, with the help of some wonderful friends, I started to run Cat-6a cabling to various rooms in the house. The runs are complete from the wall location to where they drop through the subfloor to the trusses in the basement. Most of the run will be through these trusses to the eventual patch panel location. I will finish the run once the basement concrete is poured and set.
After that was complete, the ceiling and gable end wall vapor barriers were attached. This will allow some attic insulation to be placed before the drywall, allowing us to start heating this floor sooner. You can see where many of the light fixtures will be in the ceiling.
Fiberglass insulation has been added to the gable end walls as well, behind the vapor barrier. These walls are built thick enough to match the ICF wall, about 10 inches total.
Basement
The basement has been heated for a while now, and we are just about ready to pour the basement slab.
There will be insulation under the slab to keep things warmer in the winter, here is a closer look at the product being used, Diversifoam Certifoam 15:
The past few days we have been mostly below 0F which is too cold for the concrete pumper crane. Tomorrow it will warm up, hopefully enough for the pour to happen.
Tuesday, February 1, 2011
Interior work
Interior walls have been framed, and the rough-in work for plumbing (drains) and electrical work has been started as well.
I will also be running a lot of Cat-6a for computers around the house in the next week or so. For interior walls this is done as usual, but for exterior walls, channels are cut in the ICF so that the wiring lays against the concrete. Scrap pieces will then be placed every foot or so on top of the wiring so it sits along the concrete, away from the drywall.
I will also be running a lot of Cat-6a for computers around the house in the next week or so. For interior walls this is done as usual, but for exterior walls, channels are cut in the ICF so that the wiring lays against the concrete. Scrap pieces will then be placed every foot or so on top of the wiring so it sits along the concrete, away from the drywall.
Subscribe to:
Comments (Atom)


